
CS02 Assembly Cycle
CS02 Assembly Cycle
Mellish engineering services have a contract to supply an assembly to a major OEM.
The assembly consists of 7 items. 3 items bought in are anti-gall paste, a bag and a label. 4 items are manufactured in house.
The problem:
- Customer complaints had been received because the locking nut had been assembled the wrong way round.
- The customer had also complained about the ‘grease’ that was applied to the main screw. In some cases the grease was barely noticeable.
- The resources required to make the assemblies was impacting on day to day production, so management decided to move the assembly process to Saturday, to have a clear, uninterrupted run. Moving the work to the weekend also incurred additional overtime premiums
- The assembly process was based on batch production, with some processes ‘off line’, then brought together for a final assembly. The batch nature often resulted in damaged and missing parts.
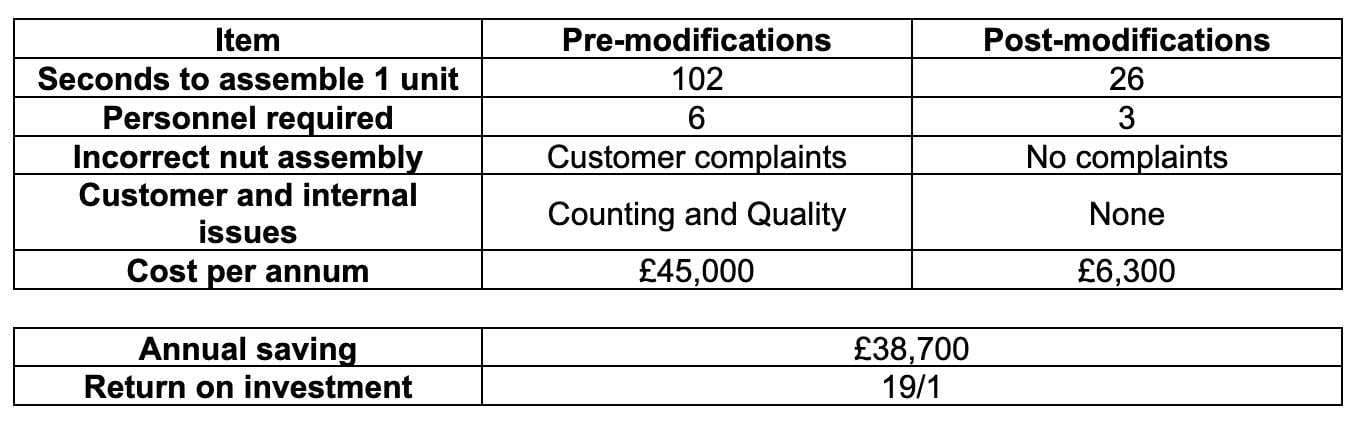
- Assembly time was 1minute 40 seconds. Six personnel were needed for 8.25 hours each to complete the task. Annual labour cost was estimated at £45,000.
- The central assembly role was trusted to just a handful of individuals who ‘knew’ the process, customer requirements and recent quality history.

The target for improvement was to reduce the processing time and rejects. At this stage we weren’t able to calculate what the improvements might look like, but we felt confident they would be significant.
A team was created that included most of the regular process operators, the supervisor, the salesperson that managed the contract and the managing director. It’s good to see someone at a senior level engage like they did. It usually means decisions on resources are not going to be a problem. A flow chart was created. This enabled the process to be mapped or described in actual steps with everyone’s input being crucial. Next, an Ishikawa diagram was produced, which allowed everyone in the team, including customers of, and suppliers to, the process, to have their input and highlight areas of concern. The concerns were many and varied but none of them were deemed too challenging to fix or improve. Some issues were grouped and some were stand alone.
An improvement plan was created.
It quickly became apparent, there was no standard process. Every time the process ran, it was set up in a new way, looking slightly different to the previous versions. Tooling and consumables had to be located and brought to the assembly area.
Key to the success of the process improvement was the idea of single piece flow, since this type of assembly work is very well suited to it. A few changes were identified as important to the success.
Firstly a fixture was designed and produced, in house, to allow the assembly to be ‘torqued’ safely and quickly. This operation had been produced by hand with operators holding assemblies aloft as they applied torque using a battery powered torque gun. Two operators stood side by side on this process with each having their own technique. An obvious sign of a non-standard approach. The fixture was designed with a visual error proof (poka yoke) in place so the nut was always oriented correctly. A later redesign of the fixture added a physical poka yoke to make it impossible to misalign the nut.
Secondly a suitable bench / work area was identified where boxes of items could be fed directly into the assemblers work areas.
Thirdly the packing was brought into the assembly, so finished assemblies could be placed directly into shipping cartons and counted.
After a few days of trials and modifications, the process had been transformed, with welcome results, including a 392% reduction in assembly time.
Contact CQual today and let us take the complexity out of quality.